


















TL;DR: To storyboard a novel, write your premise, pick a story structure, put your major plot points on cards, fill in the scenes between them, and color-code characters and subplots. Then step back, look for gaps and pacing problems, and turn the board into a scene-by-scene writing plan. Index cards work fine, and so do tools like Scrivener, Plottr, or Milanote.
Most novels don't fall apart on page one. They fall apart somewhere around the middle, when you're 30,000 words in and realize the villain hasn't shown up in eight chapters, your subplot quietly disappeared, and you have no idea how the ending is supposed to happen. Fixing that after the fact can mean months of rewriting.
Storyboarding is how you catch those problems before you write them. Instead of keeping the whole story in your head (or in a 20-page outline you never reread), you lay every scene out where you can see it, move it around, and spot the holes while they're still cheap to fix.
This guide walks you through exactly how to storyboard a novel, step by step. You'll also get a free scene card template, a complete example board, and advice on which tools are worth using.

What is a storyboard for a novel?
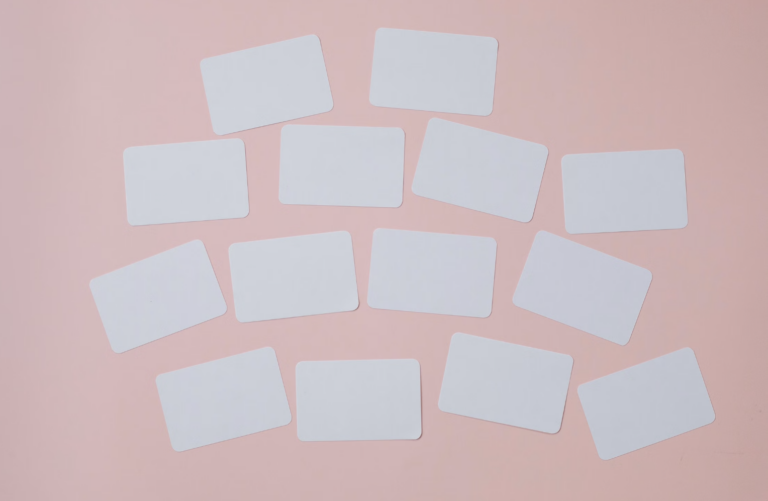
A novel storyboard is a visual map of your book, with one card per scene, arranged in order so you can see your whole plot at once and rearrange it freely.
Storyboards started in film. Walt Disney Studios is usually credited with popularizing them in the 1930s, when animators pinned sketches to a wall so the whole team could see a cartoon before anyone animated it. Novelists borrowed the idea, swapping drawings for short scene descriptions on index cards, sticky notes, or digital cards.
The point is to get an overview. When every scene sits side by side, you notice things a written outline hides, like three slow scenes in a row or a character who vanishes for a third of the book. Before you start, it helps to know four terms you'll use on your board.
Scene: A single unit of story in one place and time, where a character wants something and runs into resistance.
Sequence: A group of connected scenes that work toward one larger goal, like escaping a city or solving one clue.
Act: A major section of the book. Most novels use three: setup, confrontation, and resolution.
Plot point: A turning point that changes the story's direction, like the inciting incident, the midpoint, or the climax.
Storyboarding vs. outlining: what’s the difference?
An outline is a written list you read top to bottom. A storyboard is a visual layout you can rearrange, which makes structure and pacing problems much clearer.
You don't have to choose one or the other. Plenty of authors write a rough book outline first and then storyboard it to test the structure. Here's how the two compare.
| Traditional outline | Storyboard | |
|---|---|---|
| Format | Written list or document | Cards arranged on a board or screen |
| Best for | Capturing ideas in order | Seeing structure, pacing, and gaps at a glance |
| Rearranging scenes | Cut, paste, and renumber | Move a card |
| Tracking subplots | Hard to see across pages | Visible through color-coding |
| Who loves it | Linear thinkers | Visual thinkers and anyone juggling multiple plotlines |
How to storyboard a novel in seven steps
Start with a one-sentence premise, set up your structure, place your big plot points first, then fill in scenes, color-code, review, and turn the board into a writing plan.
You can do all of this with a pack of index cards and a blank wall. If you'd rather work digitally, the steps are exactly the same.
1. Write your premise in one or two sentences
Before you make a single card, write down who your main character is, what they want, and what stands in their way. For example: "A young magician must find a lost artifact before magic disappears from her city for good, but the only person who knows where it is wants it for himself."
Pin this at the top of your board. Every card you add later should connect back to it somehow. If a scene doesn't, that's a sign it might not belong.
2. Choose a structure and set up your columns
Your structure gives the board its shape. The most common is three acts, with one column for each. If you prefer a more detailed framework, like the hero's journey or a beat sheet, give each stage its own column instead.
As a rough guide, act one takes up about the first quarter of a novel, act two the middle half, and act three the final quarter. Leave more room in your act two column, because that's where most of your scenes will live.
3. Place your major plot points first
Don't start with scene one. Start with the turning points that hold your story up, and give each one its own card:
- The inciting incident that kicks off the story
- The first plot point, where your hero commits and there's no going back
- The midpoint, where something shifts and the stakes go up
- The low point, where everything seems lost
- The climax and the resolution
Once these are in place, you have the spine of your book. Everything else is filling in how your character gets from one turning point to the next. (If you're still shaping those big moments, our breakdown of story arcs is a good companion.)
4. Fill in the scenes between plot points
Now add a card for every scene you can think of between each pair of plot points. Keep each card short. A scene card only needs to answer three questions: what does the point-of-view character want here, what gets in the way, and how does it end?
If a card doesn't have a clear answer to all three, mark it with a question mark and keep going. You'll come back to it in step six. Don't worry about getting every scene right yet. The beauty of cards is that you can move or toss them later.
5. Color-code characters, subplots, and threads
This is where a storyboard pulls ahead of a written outline. Give each major thread its own color. You might use one color for the main plot, another for the romance subplot, another for the villain's scenes, and another for world-building or backstory.
You can color the cards themselves, add colored dots, or use colored pins. Whatever you choose, keep a small key in the corner of the board so future you remembers what each color means.
6. Step back and look for problems
Walk away for a day, then look at the board with fresh eyes. This is the step most writers skip, and it's the reason storyboarding works. Look for:
- Long stretches of one color, which usually means a subplot or character has disappeared
- Several quiet, reflective scenes in a row with no rising tension
- Cards that still have question marks on them
- A thin act two, which is the most common cause of a sagging middle
Fix the problems by moving, merging, cutting, or adding cards. Our guide to pacing in writing goes deeper on balancing fast and slow scenes.
7. Turn your board into a writing plan
Number your cards in order. Each one is now a writing session. If you're aiming for an 80,000-word novel and you have 55 scene cards, that's an average of roughly 1,450 words per scene, which gives you a realistic daily target. Check how many words are in a novel for your genre to set the right total.
Keep the board up while you draft. You'll change it as you go, and that's fine. A storyboard is a map, not a contract.
Free novel storyboard template
Copy these fields onto every scene card. They capture enough to write the scene later without turning your board into a second draft.
Scene #
Its position in the book (you'll renumber as you move cards)
Act / sequence
Which column it belongs in
POV character
Whose eyes we're seeing the scene through
Goal
What that character wants in this scene
Conflict
What or who gets in the way
Outcome
How it ends: a win, a loss, or a new complication
Thread / color
Main plot, subplot, villain, or world-building
Setting
Where and when it takes place
Word target
Your rough length goal for the scene
If you want a full outline to pair with this, our free book outline template generator builds one for you based on your book.
A novel storyboard example
Here's what a finished storyboard looks like for a fantasy novel, showing the key cards in each act and how color-coding reveals the shape of the story.
Let's go back to our young magician. After the first pass through steps one to five, the board for her story looked like this (simplified to the main cards):
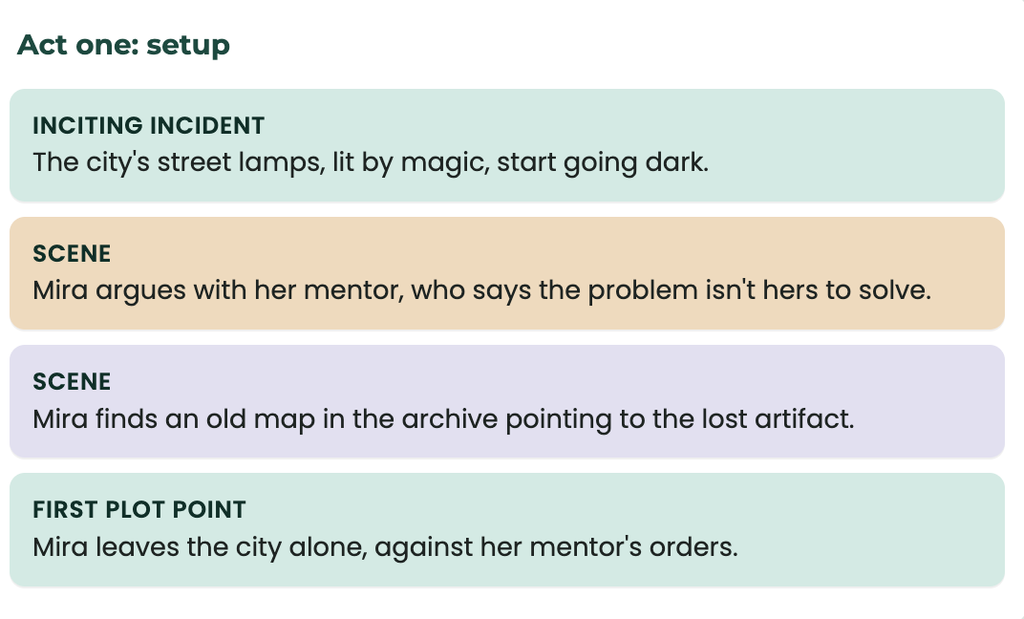
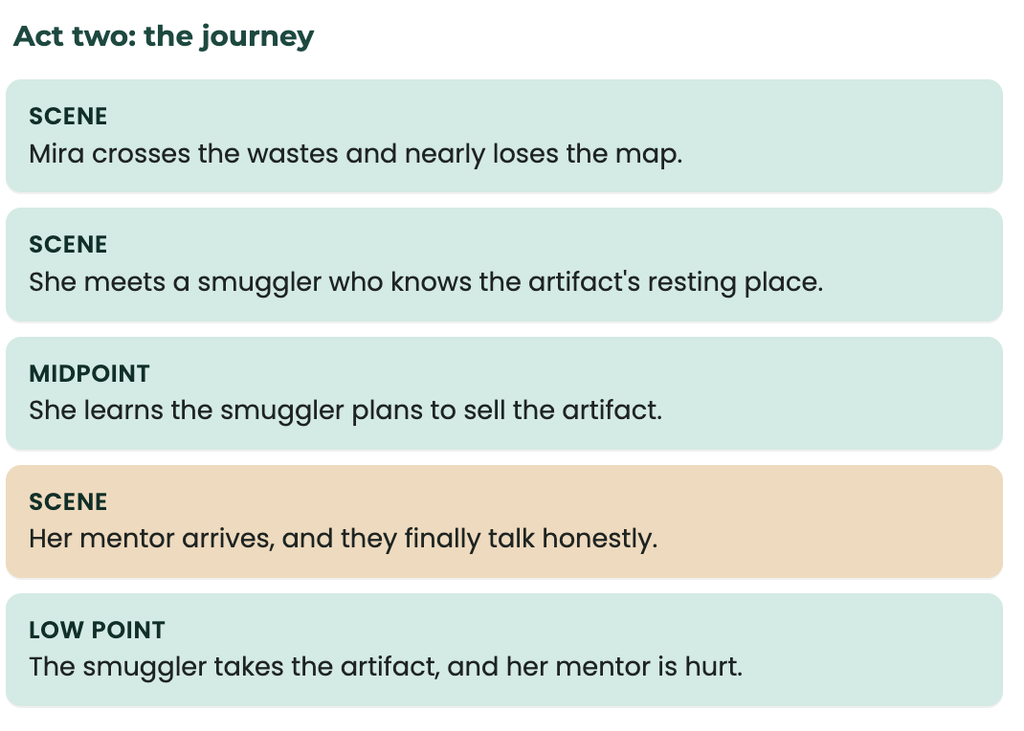
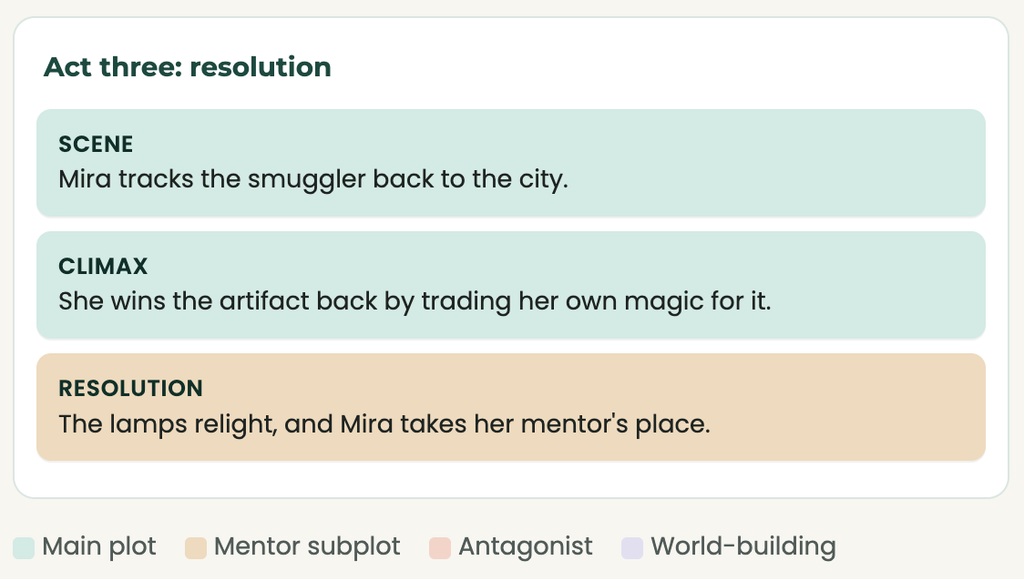
When the author stepped back in step six, the problem jumped out right away. There's no antagonist color anywhere in acts one or two. The smuggler only becomes a threat at the midpoint, so the whole first half had no real opposition, and the middle felt slow.
The fix was two new cards. In act one, a rival magician from the city council is shown quietly hoarding what's left of the magic. In act two, that rival sends someone to follow Mira. Suddenly the journey has a clock and a pursuer, and the climax pays off a threat the reader has been feeling for a hundred pages. That's a change that would have taken weeks to find in a finished draft and took about ten minutes on the board.
The best storyboarding tools for writers
Index cards on a wall are still one of the best tools. Digital options like Scrivener, Plottr, and Milanote are worth it if you write on several devices or have a complex plot.
| Tool | Type | Best for |
|---|---|---|
| Index cards or sticky notes | Physical | Writers who think better with their hands, and anyone starting out |
| Corkboard or whiteboard | Physical | Keeping a large board visible while you draft |
| Scrivener | Writing software | Storyboarding and drafting in one place, using its corkboard view |
| Plottr | Plotting software | Series, timelines, and multiple subplots across books |
| Milanote | Visual board app | Mixing scene cards with images, maps, and mood boards |
| Trello or Notion | General board apps | Writers who already use them and want something familiar |
The best tool is the one you'll actually open every day. If you're stuck choosing, start with paper. You can always move to software once you know what you need. For a broader comparison, see our roundup of the best book writing software.
How to storyboard by genre
The seven steps stay the same in every genre. What changes is what you track with color, because every genre has its own promise to the reader.
| Genre | What to track on your board |
|---|---|
| Mystery and thriller | Clues, red herrings, and reveals, so every clue is planted before it pays off. Our guide to thriller subgenres helps you pick your lane. |
| Romance | Each step forward and back in the relationship, so the tension builds instead of stalling. |
| Fantasy and sci-fi | World-building scenes versus action scenes, plus locations if your characters travel. A fantasy map pairs well with your board. |
| Historical fiction | Real events in one color and your fictional plot in another, so the timeline stays accurate. |
| Literary fiction | Your character's inner change and the themes each scene touches. See our list of common themes in books. |
| Young adult | The protagonist's growth alongside the external plot, so both arcs land at the climax. |
Storyboarding if you’re a pantser
Pantsers can storyboard after the first draft instead of before it. A reverse storyboard turns a messy draft into a map you can revise from.
If planning ahead drains the fun out of writing for you, you're not alone. Lots of authors discover their story by writing it. Storyboarding still helps. It comes later in the process.
Once your first draft is done, read through it and make one card for every scene you actually wrote. Then follow steps five and six: color-code and look for problems. You'll quickly see which scenes repeat each other, which threads go nowhere, and where the draft needs a new scene to connect two ideas. Many authors find revision far less overwhelming this way, because they're working from a one-page map instead of a 300-page draft.
Common storyboarding mistakes
The biggest storyboarding mistakes are writing too much on each card, skipping the review step, and treating the board as fixed once you start drafting.
- Writing paragraphs on your cards. If a card takes more than a minute to read, it's too long. Keep it to a few lines so you can scan the whole board.
- Starting with scene one. Placing the big plot points first stops you from building a beautiful opening that leads nowhere.
- Skipping the step back. The review in step six is where the real value is. Don't rush it.
- Forgetting the characters. Plot cards are quick to make, but every scene should change your characters too. Our guide to character development helps you build those changes in.
- Refusing to change the board. Your story will shift as you draft. Update the board when it does, so it stays useful all the way to the end.
Storyboarding is one of the tools our fiction coaches use with authors who feel stuck in the middle of a draft. At selfpublishing.com, we've helped authors publish more than 7,000 books, and the ones who finish almost always have a clear plan for their story before they push through the hard middle. If you'd like a coach to walk you through yours, you can book a free call with our team.
Frequently asked questions about storyboarding a novel
What are the steps to storyboard a novel?
There are seven: write your premise, choose a structure and set up columns, place your major plot points, fill in the scenes between them, color-code your threads, step back to find gaps and pacing problems, and turn the finished board into a scene-by-scene writing plan.
Is storyboarding a book different from storyboarding a novel?
For prose fiction, it's the same process. Children's picture books and graphic novels are different, because you're planning pages and panels with images, so those storyboards usually include rough sketches. Our guide on how to write a children's book covers picture book planning.
How many scene cards should a novel storyboard have?
It depends on your word count and how long your scenes run. A useful rule is to divide your target word count by your average scene length. An 80,000-word novel with scenes around 1,500 words would need about 53 cards.
Can ChatGPT or other AI tools create a storyboard for my novel?
AI tools can help you brainstorm scene ideas or summarize a finished draft into a list of scenes, which is handy for a reverse storyboard. But the decisions about what happens, and why, should be yours. Use AI as a sounding board, not as the author of your plot.
What are the five stages of a novel?
The five classic stages are exposition, rising action, climax, falling action, and resolution. They map neatly onto a storyboard: exposition and early rising action in act one, most of the rising action in act two, and the climax, falling action, and resolution in act three.
Should I storyboard before or after my first draft?
Either works. Plotters usually storyboard before drafting to plan the story. Pantsers often storyboard after the first draft to see what they wrote and plan their revision. Many authors do both.